
Deck removal often begins with one simple realization—the structure that once enhanced your outdoor space has started to wear out its welcome. Time, weather, and constant use can leave even the sturdiest decks splintered, sagging, or unsafe. Removing an old deck isn’t just about clearing space; it’s about creating opportunity. Once it’s gone, you open the door to fresh design ideas, new landscaping, or simply a safer, cleaner environment around your home.
For many homeowners, though, deck removal can feel like a daunting project. There’s more to it than just grabbing a hammer and pulling up boards. Each section must be disassembled carefully to avoid damaging your home’s exterior or underground utilities. The process may seem intimidating at first glance, but when approached methodically, it becomes surprisingly manageable. Whether you plan to do it yourself or call in professionals, understanding why and how this task matters sets the tone for success.
Preparing Your Space Before the Work Begins
Before the first board is loosened, preparation makes all the difference. The area surrounding the deck needs to be cleared of furniture, planters, and decorations. These small steps might seem insignificant, yet they pave the way for safer, faster removal. Checking the structure for electrical wiring or lighting fixtures is crucial, too. Many decks are connected to outdoor outlets, and cutting through those wires accidentally can cause unnecessary trouble.
Next, consider where the debris will go. Old lumber, nails, and concrete footings can pile up faster than expected. Renting a dumpster or arranging for hauling in advance saves time later. And if you’re planning to build a new deck afterward, measuring and photographing the area before demolition helps with future designs. Proper preparation isn’t glamorous, but it’s what keeps a deck removal project efficient and stress-free from the start.
Evaluating the Condition of Your Existing Deck
Before any demolition begins, take a moment to study the current condition of your deck. Look for rotted boards, loose nails, and weakened railings. These signs reveal where the structure might collapse or break apart more easily, guiding your removal strategy. Older decks, especially those built with untreated wood, often have hidden decay beneath the surface. Knowing where the weak points are helps prevent injury and keeps the project under control.
It’s also smart to note which parts of the deck are still sturdy. You may find that certain beams or posts can be salvaged for reuse or recycling. Evaluating the deck thoroughly allows for safer dismantling and reduces waste. A well-planned assessment can also determine whether the foundation can be reused for a future build, saving money in the long run. Taking this step may feel slow, but it lays the groundwork for smoother removal and smarter reconstruction later.
Choosing Between DIY and Professional Help
Every homeowner faces the same decision at this stage—should you handle the job yourself or hire professionals? Doing it on your own can save money and offer a sense of accomplishment. It’s a chance to get hands-on with your property and control each detail of the project. However, DIY deck removal demands strength, patience, and the right tools. Without proper safety equipment or disposal planning, it can quickly turn overwhelming.
On the other hand, professional removal services streamline the process. They bring experience, specialized equipment, and a team to handle everything from dismantling to debris removal. While it comes with a cost, hiring experts often saves time and prevents potential damage to your home or yard. Whether you go solo or call in help depends on your comfort level, available tools, and schedule. Each option carries its own benefits—it’s about choosing what fits your needs best.
Tools and Equipment That Make the Job Easier
Deck removal may sound like a brute-force task, but the right tools can turn it into a smooth and efficient process. Essential items include pry bars, hammers, reciprocating saws, and drills. Each tool serves a purpose—some help dismantle decking boards while others separate beams or remove screws. Investing in a sturdy wheelbarrow or heavy-duty trash bags also simplifies cleanup. Wearing gloves, eye protection, and sturdy boots isn’t optional; it’s part of doing the job safely.
For larger decks, renting power tools can make an enormous difference. Jackhammers can break through concrete footings, while circular saws cut through thicker sections quickly. If you’re tackling this as a DIY project, familiarize yourself with how each tool operates before using it. Understanding your equipment’s strengths keeps the workflow steady and minimizes mistakes. Efficient deck removal isn’t about speed—it’s about precision and preparation combined.
Step-by-Step Breakdown of the Deck Removal Process
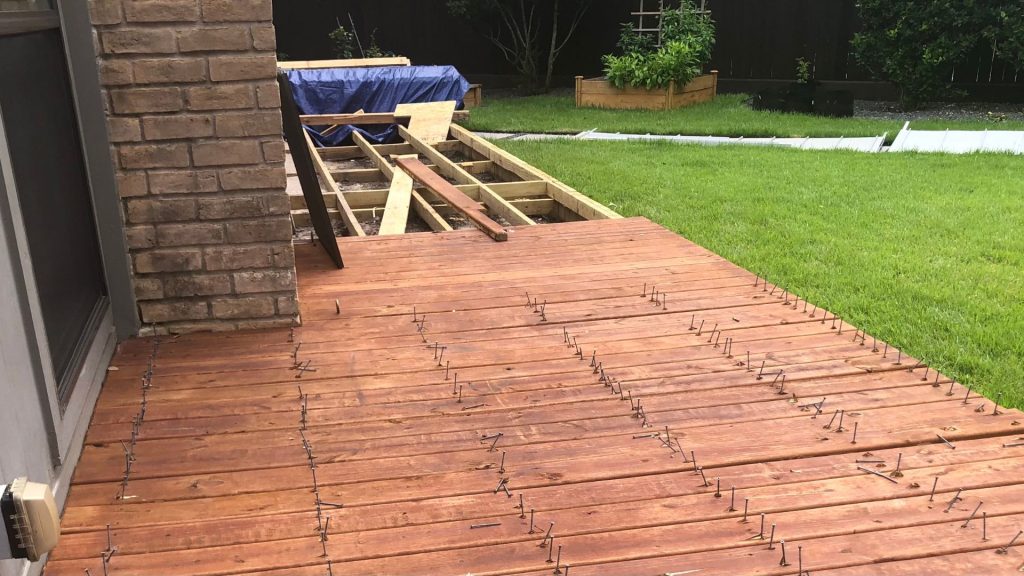
Start from the top and work your way down. That’s the golden rule for any deck removal project. Begin with railings and stairs, as these are often the easiest parts to remove and open up space for the main structure. Once those are out of the way, focus on prying up deck boards one by one. Be mindful of nails and screws; removing them carefully ensures they don’t scatter across your yard. Slow and steady often beats fast and messy when dealing with old construction.
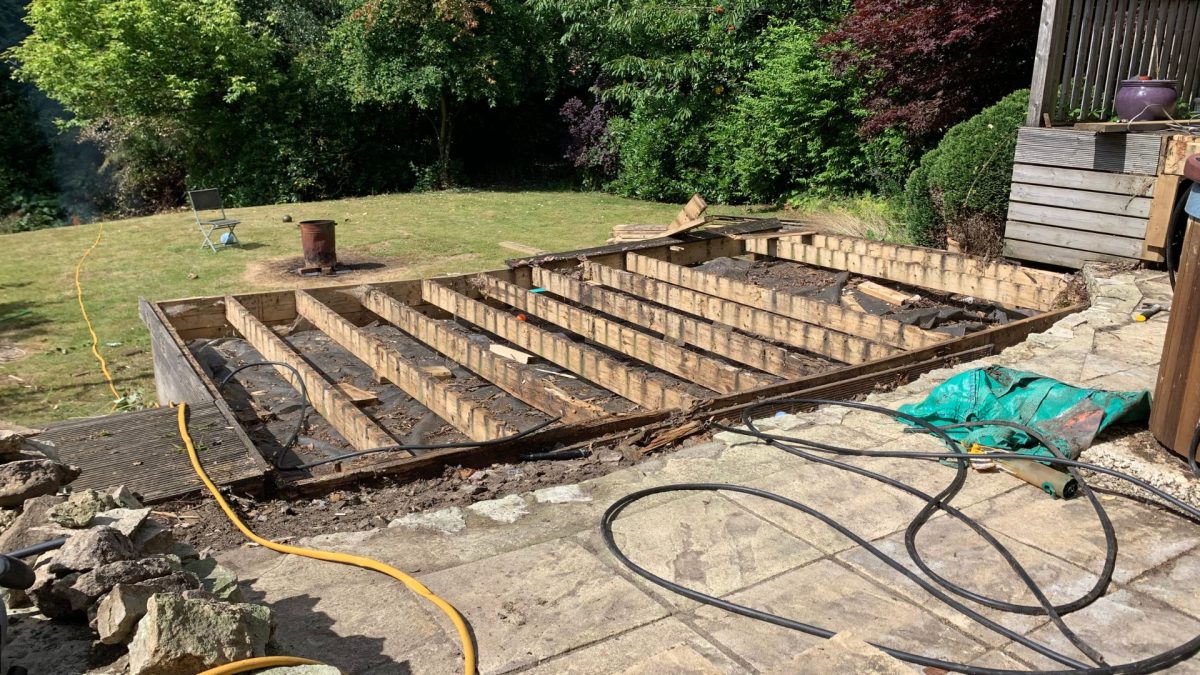
After the surface boards are gone, you’ll reach the support frame—the heart of the deck. Cutting beams and joists into manageable sections helps with disposal. Pay special attention to the posts anchored in concrete, as these can require extra effort or even power tools to remove. Following a clear, methodical approach keeps the project under control and helps prevent damage to nearby landscaping or siding. Each step completed thoughtfully brings you closer to a clear, usable space once again.
Managing the Disposal of Deck Materials
Once the deck is gone, a new challenge arises—what to do with the remains. Piles of wood, metal fasteners, and chunks of concrete can quickly clutter your property. Sorting materials right away saves time later. Separate treated wood from untreated wood since some disposal centers handle them differently. Nails and screws can be gathered with a magnetic sweeper to avoid tire punctures or foot injuries.
Many homeowners choose to recycle old decking materials. Some types of wood can be repurposed for garden beds, outdoor benches, or firewood if untreated. However, treated wood must be disposed of properly to avoid environmental hazards. Partnering with a junk removal or hauling service simplifies this process, ensuring everything ends up where it should. Clean, responsible disposal isn’t just about getting rid of waste—it reflects care for your home and the community.
Environmental Considerations When Removing a Deck
Deck removal doesn’t have to mean sending everything to the landfill. Many of the materials can find new life through recycling or repurposing. Old metal railings, screws, and brackets often go straight to scrap yards. Even wood, when untreated, can be creatively reused for outdoor projects. Taking a mindful approach to what happens after removal makes a significant impact. It keeps your project environmentally responsible while reducing the overall waste footprint.
Moreover, using eco-friendly disposal options ensures that harmful chemicals from treated lumber don’t seep into soil or groundwater. Contacting local recycling centers before starting the project helps you understand their requirements. Sometimes, even professionals can guide you toward sustainable solutions. Deck removal might seem purely practical, but it also offers a chance to make environmentally conscious choices that contribute to a cleaner, safer neighborhood.
Post-Removal Cleanup and Site Preparation
After the deck is gone, the real transformation begins. What’s left behind is often uneven ground, bits of debris, and maybe even concrete stubs where posts once stood. Cleaning the site thoroughly helps visualize what comes next. Raking up nails, screws, and small wood fragments prevents future injuries. It’s also the moment to inspect your home’s siding or foundation for any accidental damage that occurred during the removal.
Once the area is clean, you can begin leveling the soil or laying groundwork for your next project. Whether you plan to rebuild, install a patio, or start a garden, having a clear and stable surface makes all the difference. Site preparation after deck removal might seem like a small step, but it sets the stage for whatever outdoor vision you have in mind. This phase marks the shift from demolition to creation—the exciting part of any home improvement journey.
Budgeting and Planning for Deck Removal Costs
Financial preparation is often overlooked until the project is already underway. The total cost of deck removal depends on several factors, such as deck size, material type, and accessibility. DIY removal can reduce expenses but may increase labor time and cleanup responsibilities. On the flip side, hiring professionals means upfront payment but offers efficiency and peace of mind. Considering these trade-offs helps you make informed financial choices.
Additional expenses may include dumpster rentals, tool purchases, or landfill fees. Planning for these early prevents unwanted surprises later. Even a simple budget spreadsheet can help track each component of the project. By anticipating costs, homeowners can maintain control over their finances and ensure a smoother experience from start to finish. Deck removal doesn’t have to strain your budget—it just requires thoughtful planning and clear priorities.
Conclusion
Removing a deck isn’t just another home improvement task—it’s an investment in reclaiming your outdoor space. When done with preparation and purpose, the process reveals the hidden potential beneath old boards and fading paint. Each careful step, from dismantling railings to clearing debris, contributes to a cleaner, safer, and more inviting property.
For those seeking reliable help with the heavy lifting, 24-7 Junk Removal in Palatine, IL offers professional assistance in handling the debris and cleanup that follow. Whether it’s hauling old materials or providing efficient junk removal, their team makes the transition effortless. Located at 611 W. Wise Schaumburg, IL 60193, they can be reached at (773) 309-6966 or via email at support@24-7junk.com. With expert support and a thoughtful approach, your outdoor transformation begins not with demolition—but with a fresh start.