

Carpets that have served their time eventually show their age. Fibers flatten, stains linger, and odors seem impossible to chase away. Beyond appearances, old carpeting can hide allergens, dust, or even mold, which makes removal more than just an aesthetic choice. Deciding to take out your carpet is about creating a cleaner, healthier space while also preparing the floor for a fresh look that suits your lifestyle.
Think of carpet removal as a reset button for your living space. Once it is pulled up, you gain the chance to choose a surface that feels better, looks sharper, and is easier to maintain. Hardwood, tile, or even new carpet can only look its best if the old material is properly removed. That initial step sets the foundation for what comes next, making the removal process essential to the success of any home improvement project.
Preparing Your Room Before Starting
Before rolling up sleeves, a room has to be stripped down to its bare bones. Furniture, lamps, and even those forgotten odds and ends tucked in corners should be carried out. Emptying the space allows freedom to move and ensures nothing gets damaged or stained during the process. It also makes it easier to roll back large carpet sections without awkward obstacles.
After clearing the room, focus on safety. Wearing gloves prevents blisters while a simple mask reduces dust inhalation. Having the right tools within reach, from pliers to a utility knife, spares you frustration later. Preparation is the difference between struggling in stops and starts versus carrying out the task in steady rhythm. A cleared room with organized tools invites efficiency and minimizes stress.
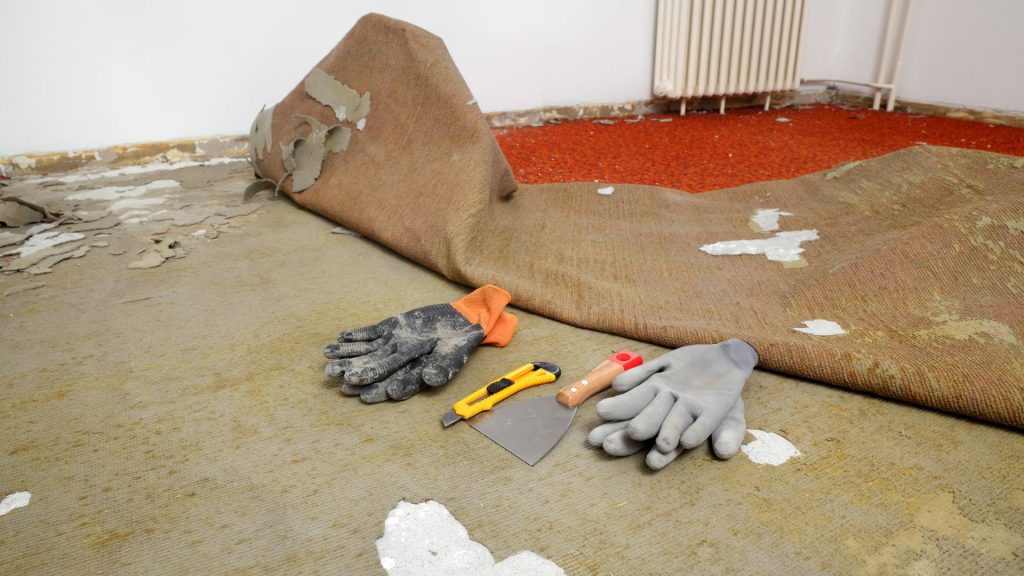
Locating and Tackling Carpet Edges
Carpet removal begins at the edges where the fabric meets the wall. Tucked beneath baseboards or held down by tack strips, these edges require gentle prying. A utility knife cuts a clean starting point, while pliers help pull up corners. Once a corner is loose, it provides a grip to start peeling the carpet away from the floor.
This step may seem simple, but patience matters. Tack strips are studded with sharp nails that grip tight, and forcing the carpet too aggressively could cause injury. By working along the perimeter, you loosen enough edge to create manageable folds. With care, each edge can be freed without leaving fibers stuck or tearing awkwardly, making the larger roll-up smoother to handle.
Cutting the Carpet into Sections
A carpet spread across an entire room is heavy and unwieldy. The smartest approach is slicing it into sections that can be rolled and carried with ease. Using a sharp utility knife, make long cuts through the backing side of the carpet rather than the fabric. This helps avoid fraying and keeps the sections uniform in size.
The act of cutting transforms what was once an overwhelming sheet into manageable strips. Smaller sections are safer to lift and carry, reducing strain on your back. They can also be stacked or removed more quickly, especially in rooms where stairs or narrow hallways pose challenges. Breaking the job into sections creates progress that feels rewarding, helping you push through until the entire floor is clear.
Rolling and Bundling the Carpet
Once cut, the carpet can be rolled tightly into compact bundles. Rolling helps keep dust and dirt contained while making disposal far less chaotic. Begin from one end and apply steady pressure to create a firm, cylindrical roll. Straps, twine, or duct tape secure each roll so it doesn’t unravel mid-carry.
Bundling is a small but important detail. Loose carpet flops awkwardly and makes transportation difficult, but a neat roll turns into something you can stack in a truck bed or haul out to the curb. Think of each bundle as a finished chapter, one more piece of the room transformed. The process of bundling keeps the work orderly, paving the way for quicker cleanup afterward.
Removing the Carpet Padding
Beneath the carpet lies the padding, often stapled or glued to the subfloor. Padding may appear thin, yet it clings stubbornly and can be messier than expected. To remove it, start by pulling up sections just like the carpet itself. If it’s stapled, use pliers or a floor scraper to tug them free, working methodically across the surface.
Padding removal can feel tedious compared to the thicker carpet above it, but skipping this step isn’t an option. Fresh flooring demands a smooth foundation. Lingering staples or clumps of padding interfere with installation, so taking time here ensures you won’t face bumps or uneven surfaces later. The cleaner the subfloor, the easier your next project will unfold.
Tackling the Tack Strips
Once padding is gone, the thin wooden strips studded with nails still guard the perimeter. These strips hold the carpet edges tight, but now their job is finished. To remove them, wedge a pry bar beneath and apply steady pressure. Working carefully avoids splintering the wood or gouging the subfloor beneath.
Tack strips may break apart in places, and that is perfectly normal. Collect pieces as you go to avoid scattered hazards. Though often overlooked, removing these strips completes the transformation from carpeted room to blank slate. Without them, the floor becomes ready to welcome new material without interference, marking the true end of the removal stage.
Cleaning the Subfloor Thoroughly
A room stripped bare reveals the subfloor, sometimes dusty, sometimes dotted with staples or glue residue. Taking time to clean it thoroughly ensures it’s ready for whatever comes next. Use a broom or shop vacuum to sweep debris, then inspect carefully for nails or staples that escaped earlier removal. Every stray piece is worth finding before new flooring is laid.
If adhesive remains, a scraper can loosen it while a little warm water or adhesive remover helps dissolve stubborn patches. The smoother the surface, the better the new flooring will sit. This stage may not feel glamorous, but it is the unsung hero of a well-done flooring project. The attention invested here will pay off every day as your new surface looks clean, sits even, and lasts longer.
Disposing of the Carpet Responsibly
Carpet disposal isn’t just about getting it out of the house. Many local guidelines dictate where and how it can be left, since carpet is bulky and not always accepted in curbside bins. Some facilities recycle carpet materials, turning old fibers into new products, while others require drop-off at designated waste centers.
Rolling bundles make this stage simpler, but checking local regulations saves wasted trips. Eco-conscious disposal means less waste ends up in landfills, offering a cleaner option for both home and environment. Proper disposal closes the chapter neatly, ensuring your effort leads to a space refreshed and a footprint reduced.
Considering Professional Help
While carpet removal can be tackled solo, not everyone has the time or desire to wrestle with staples, tack strips, and disposal rules. Professional services handle the entire process, from lifting the first corner to sweeping up the last nail. Their efficiency saves hours, and their equipment ensures nothing is overlooked.
Choosing expert help also spares you heavy lifting and disposal headaches. For large homes or multi-room projects, professionals can complete in a day what might take you a weekend or longer. Peace of mind and a quicker turnaround are reasons many homeowners prefer outsourcing this task, especially when balancing busy schedules with renovation goals.
Conclusion
Removing carpet is more than just pulling up fabric. It’s an orderly process of preparation, cutting, rolling, and clearing the room down to a clean foundation. Each stage connects to the next, transforming a worn surface into a space ready for renewal. Done with care, the process reveals a room’s potential while offering the satisfaction of progress well earned.
If tackling carpet feels overwhelming, you can rely on 24-7 Junk Removal in Palatine IL for efficient junk removal services. Their team can handle carpet removal and more, sparing you from the heavy lifting. Call (773) 309-6966 or reach out at support@24-7junk.com to schedule dependable help when you are ready for a fresher space.