
Planning Ahead Before the First Swing
Kitchen demolition cleanup begins long before the first cabinet is pried off or the tiles are smashed. Planning is the unsung hero of an efficient cleanup process. The moment you decide to tear down your old kitchen, preparation should already be in motion. Create a checklist that details what will be removed, what will stay, and how the waste will be handled. Every appliance, countertop, and broken tile has a destination — whether that’s recycling, donation, or disposal. This pre-planning not only saves time but also prevents the chaos that often comes with spur-of-the-moment decisions once the dust starts to rise.
Another part of planning that’s often overlooked is communication. Make sure everyone involved — from contractors to family members — knows the timeline, rules, and safety guidelines. Label everything, cover floors to prevent scratches, and decide where debris will be collected. With structure and foresight, the cleanup feels less like a daunting battle and more like a coordinated operation. Preparation clears the mental clutter as much as the physical mess, setting the stage for an organized and efficient demolition cleanup.
Protecting the Space Beyond the Kitchen
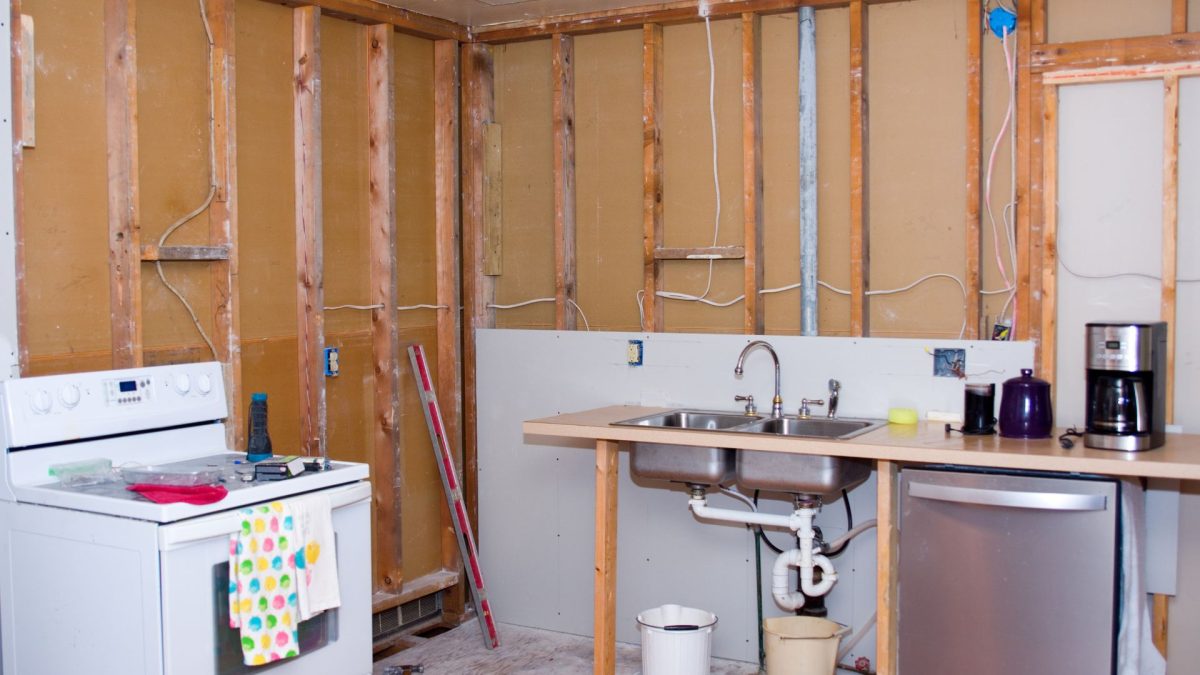
When demolition begins, debris and dust have no sense of boundaries. The key is to protect surrounding spaces before chaos unfolds. Cover doorways with plastic sheeting, seal off vents, and lay down protective floor coverings to keep dust from traveling. Even the smallest renovation can send particles into air ducts or adjoining rooms, turning a contained mess into a house-wide problem. Keeping barriers tight and surfaces protected minimizes extra cleanup work later.
Don’t underestimate the value of air control during demolition. Open windows when possible or use air scrubbers to keep fine dust from settling everywhere. This not only protects your home’s interior but also contributes to a safer breathing environment. It’s easy to overlook this detail when you’re focused on ripping out cabinets, but the difference in post-demo cleanup time can be substantial. Protecting what’s beyond your work zone ensures that cleanup stays manageable, focused, and efficient from start to finish.
Sorting Materials as You Go
One of the most effective ways to make kitchen demolition cleanup faster is by sorting debris as it’s created. Instead of letting everything pile up into one overwhelming heap, categorize the waste into recyclables, reusable items, and true trash. Cabinets, wood, and metal often have second lives beyond the demolition site. Proper sorting not only helps the environment but also streamlines disposal later — you won’t have to sift through piles trying to separate materials when you’re already exhausted from the tear-down.
Keeping bins or containers nearby allows for easy organization on the spot. Label them clearly for clarity among helpers or contractors. Recyclables such as metal fixtures or glass panels can go in one, while broken drywall and tile go in another. It may sound tedious, but the payoff is tremendous. When demolition ends, your cleanup transitions seamlessly into disposal — no wasted hours, no frustration. It’s an efficient rhythm that keeps the site orderly and your project moving forward.
Using the Right Tools for the Cleanup
A successful kitchen demolition cleanup relies heavily on having the right tools ready before the dust settles. A shop vacuum designed for heavy debris, sturdy trash bags, and protective gloves are essential. Brooms can only do so much when fine dust and sharp fragments cover the floor. Equipping yourself with industrial-grade gear means you can clean faster and safer. A high-quality dust mask also protects your lungs from drywall and insulation particles that linger in the air long after demolition ends.
While tools make the job easier, technique matters just as much. Start from the top down — ceiling, walls, and finally the floor. This order prevents re-cleaning surfaces multiple times. For larger debris like wood planks or tile chunks, use heavy-duty bins or wheelbarrows to move material quickly without multiple trips. Investing in the right cleanup tools isn’t an expense; it’s a time-saver that pays off through reduced effort and better results.
Handling Hazardous Materials Safely
During kitchen demolition, hazardous materials can easily go unnoticed — until they become a problem. Older homes often hide substances like lead paint or asbestos in walls, ceilings, or flooring. These materials require special handling to avoid serious health risks. Before starting the demolition, have a professional assess your kitchen for potential hazards. Ignoring this step can turn an exciting renovation into a costly and unsafe situation.
Once identified, hazardous materials should be removed and disposed of according to local regulations. Never mix them with general debris. Protective gear is a must — gloves, masks, and safety glasses are non-negotiable. Even common items like cleaning chemicals, sharp glass, or exposed wiring demand careful handling. Efficient cleanup doesn’t mean rushing; it means knowing when to slow down for safety. The extra caution ensures a smooth, problem-free renovation process and protects everyone involved.
Containing Dust and Debris Effectively
Dust is the most persistent guest in any demolition project. Once it escapes, it settles into every nook and cranny, clinging to surfaces for weeks. The trick lies in containment. Plastic sheets, painter’s tape, and temporary barriers keep airborne particles from invading the rest of your home. Tape seams tightly, cover vents, and avoid unnecessary foot traffic between work zones. Simple steps like these drastically reduce your cleanup workload later.
Using a HEPA-filter vacuum is another game-changer. It captures the smallest dust particles that standard vacuums often miss. For extra control, lightly mist debris before sweeping to prevent dust clouds from forming. Clean the air with portable purifiers or open windows for cross-ventilation when possible. By managing dust early, you’ll spend less time wiping and more time rebuilding your new kitchen. Containment turns what could be a lingering mess into a quick, efficient cleanup operation.
Disposing of Construction Waste Responsibly
Efficient cleanup isn’t just about getting rid of the mess — it’s about doing it responsibly. Kitchen demolition generates a surprising variety of waste materials, from wood and metal to concrete and insulation. Tossing everything into one dumpster might seem quick, but it’s neither sustainable nor cost-effective. Many materials can be recycled or donated, reducing your project’s environmental footprint and sometimes even lowering disposal costs.
Check with local waste facilities to learn which materials can be repurposed or accepted for recycling. Appliances and fixtures in decent condition can often be donated to organizations or resold. For what remains, hire a professional disposal service familiar with proper sorting and recycling procedures. Responsible disposal isn’t just good for the planet — it keeps your renovation compliant with regulations and sets a positive example of sustainable renovation practices.
Maintaining Safety During Cleanup
Demolition cleanup can be deceptively hazardous. With broken tiles, sharp nails, and unstable surfaces everywhere, safety is the foundation of efficiency. Before beginning, inspect the site carefully and clear any large hazards that could cause accidents. Always wear appropriate protective gear — gloves, goggles, sturdy boots, and long sleeves. Even a small oversight can lead to injuries that delay your renovation.
Keep the area well-lit so that every piece of debris is visible, and never lift heavy items alone. Use tools designed for the job, not improvised substitutes that might break or cause harm. When in doubt, pause and reassess. Safety doesn’t slow you down; it keeps the project moving steadily without unnecessary setbacks. A safe cleanup is always a faster, more productive one — because efficiency thrives when accidents are prevented, not fixed.
Timing the Cleanup for Best Results
Timing plays an underrated yet crucial role in demolition cleanup. Many homeowners make the mistake of waiting until the end of the demolition to start cleaning, leading to overwhelming piles and longer delays. The smarter approach is cleaning in phases. As each section of the kitchen is demolished, clear debris right away. This keeps the workspace open and minimizes clutter that can cause safety hazards.
This phased approach also helps maintain morale and momentum. When you can see progress — a cleared section here, an organized pile there — the entire project feels smoother. It’s easier to spot what still needs attention and to plan for the next phase. In demolition cleanup, time management isn’t about rushing; it’s about consistent, mindful effort. A steady rhythm of teardown and cleanup turns chaos into efficiency and ensures no small detail gets left behind.
The Role of Professionals in Efficient Cleanup
Even with the best DIY effort, there are times when calling professionals is the smartest move. Experienced cleanup crews come equipped with specialized tools, vehicles, and disposal knowledge that can drastically cut down on your workload and stress. They understand how to handle heavy debris, separate recyclable materials, and dispose of waste in compliance with local regulations. Their efficiency doesn’t just come from experience but from an understanding of systems that save time and effort.
Hiring professionals also means peace of mind. Instead of spending hours trying to figure out where to haul broken countertops or how to handle hazardous waste, you can focus on the exciting part — planning your new kitchen. Professionals handle the mess, the logistics, and the heavy lifting so you don’t have to. Their expertise transforms what could be an exhausting process into a seamless, well-managed transition from demolition to renovation.
Conclusion
Efficient kitchen demolition cleanup requires planning, patience, and the right support to keep everything on track. From dust control to responsible waste disposal, every step shapes the final result of your renovation. The process may seem messy, but with a structured approach and attention to detail, your new kitchen begins with a clean, safe foundation.
For reliable and professional help, 24-7 Junk Removal in Palatine, IL is ready to make the cleanup effortless. Their junk removal services cover every stage of the process, ensuring your space is cleared quickly and responsibly. You can reach them at (773) 309-6966, visit their location at 611 W. Wise Schaumburg, IL 60193, or email support@24-7junk.com for assistance. A cleaner, better-organized renovation starts with the right team — and they’re just a call away.
