
Preparing your space before tearing down drywall is crucial to avoid unnecessary damage and chaos. Start by removing all furniture, decor, and personal items from the area. Cover floors and immovable objects with heavy-duty plastic sheets or drop cloths to catch dust and debris. Sealing off adjoining rooms with plastic barriers and painter’s tape will prevent dust from spreading throughout your home. Proper ventilation is essential, so open windows and doors where possible to allow fresh air to circulate. Removing electrical outlet covers and switch plates is also recommended to keep them clean and intact. Planning ahead can make the entire process more efficient and prevent injuries or mistakes during the removal phase. Taking these precautions ensures a controlled and safer environment, allowing for smoother progress as you tackle the drywall demolition.
Additionally, consider using the right tools for preparation. A stud finder will help locate hidden wires or pipes, reducing the risk of accidents. A utility knife, pry bar, and hammer will be your best allies in loosening drywall panels without causing structural damage. Wearing protective gear such as gloves, goggles, and dust masks is highly recommended to safeguard against injuries and inhalation of fine dust particles. Taking time to prepare the space thoroughly will not only make the removal process easier but also preserve your home’s integrity. By organizing your workspace and equipping yourself with the necessary tools, you create a foundation for an efficient and less stressful renovation journey.
Understanding the Scope of Drywall Removal
Understanding the scope of drywall removal is key to planning your renovation timeline and budget. Drywall comes in various thicknesses and materials, each requiring different handling techniques. Walls with multiple layers, moisture damage, or mold presence need special attention. Assessing the condition of the drywall and the extent of damage will help determine whether full removal or partial replacement is necessary. Taking accurate measurements of the space will also allow you to anticipate the volume of debris and the tools required. Knowing the scope prevents unnecessary labor and ensures that you address all problem areas effectively. This step is crucial in creating a clear roadmap for the demolition process, minimizing surprises and keeping your project on track.
Moreover, examining the wall’s composition helps you identify potential hazards such as hidden electrical wiring, plumbing, or insulation. Handling these elements requires extra care, sometimes necessitating professional assistance. By clearly defining the scope, you also gain insight into the disposal requirements for the removed drywall. Planning disposal in advance ensures that you have a system in place to manage the debris efficiently, preventing clutter and prolonged cleanup. A detailed understanding of what needs removal streamlines the process, making your renovation safer and more organized from start to finish. Anticipating challenges ahead of time allows for a smoother transition between demolition and construction phases.
Gathering the Right Tools for Efficient Removal
Having the right tools ready before beginning drywall removal is essential for efficiency and safety. Common tools include a utility knife for scoring drywall, a pry bar for loosening panels, a hammer for breaking stubborn sections, and a drywall saw for cutting through tough spots. Additionally, heavy-duty trash bags or a wheelbarrow can help manage debris during the process. A stud finder is indispensable for locating hidden studs, wires, and plumbing, preventing accidents and unnecessary damage. Equipping yourself with protective gear like gloves, safety goggles, and dust masks is also critical to minimize exposure to dust and sharp materials. Collecting these tools ahead of time ensures that the removal process runs smoothly without interruptions, reducing stress and enhancing productivity.
Furthermore, using specialized equipment like a cordless drill or reciprocating saw can speed up removal when dealing with large or multiple layers of drywall. Dust-containment systems or shop vacuums can also be invaluable in maintaining a cleaner work area. Ensuring that your tools are in good working condition and that replacement blades or bits are on hand prevents delays. By preparing an organized toolkit tailored to the job, you eliminate unnecessary downtime and potential frustration. A well-equipped workspace allows you to handle drywall removal methodically, promoting safety and efficiency throughout your renovation project.
Safe Techniques for Drywall Demolition
Employing safe techniques during drywall demolition is essential to protect both yourself and your home. Begin by scoring the drywall along seams and corners to weaken the panels, making them easier to remove. Using a pry bar and hammer, carefully lift and detach sections without applying excessive force that could damage underlying structures. Always start from the top and work downward to maintain control over falling debris. When cutting around electrical outlets or plumbing, ensure the power is turned off and exercise extreme caution. Following a systematic approach reduces the risk of accidents and ensures a cleaner, more controlled demolition process.
In addition, handling large drywall sheets requires careful coordination to avoid injury. Lifting with your legs rather than your back, working with a partner when necessary, and maintaining clear communication are key safety measures. Avoid standing directly under loose drywall and always wear protective equipment to shield against dust and sharp edges. Keeping a first aid kit nearby and taking breaks when fatigue sets in helps maintain focus and prevents mishaps. By adhering to safe techniques, you preserve both your health and the structural integrity of your home, ensuring that the drywall removal phase sets a solid foundation for the next steps in your renovation.
Managing Dust and Debris Effectively
Managing dust and debris is critical during drywall removal to maintain a safe and clean work environment. Dust can spread quickly throughout your home, affecting air quality and creating a long cleanup process. To minimize dust, cover floors and furniture with heavy-duty plastic and seal off adjoining rooms with tape and plastic sheeting. Use a vacuum with a HEPA filter to capture airborne particles and consider wetting down drywall surfaces lightly before removal to reduce dust production. Proper ventilation, such as open windows or fans, is essential to keep air circulating and prevent excessive buildup. Effective dust management not only protects your health but also simplifies post-removal cleanup, allowing the renovation to progress smoothly.
Additionally, handling debris methodically can save time and reduce hazards. Collect drywall fragments immediately into containers or heavy-duty bags to avoid clutter on the floor. Sorting larger pieces from smaller scraps helps with efficient disposal and recycling when possible. Assigning specific zones for debris accumulation and ensuring regular removal prevents accidents and keeps the workspace organized. Incorporating these strategies into your demolition plan reduces cleanup time, protects surfaces from scratches or damage, and maintains a safe environment for everyone involved. Managing dust and debris effectively is essential for a controlled and stress-free drywall removal experience.
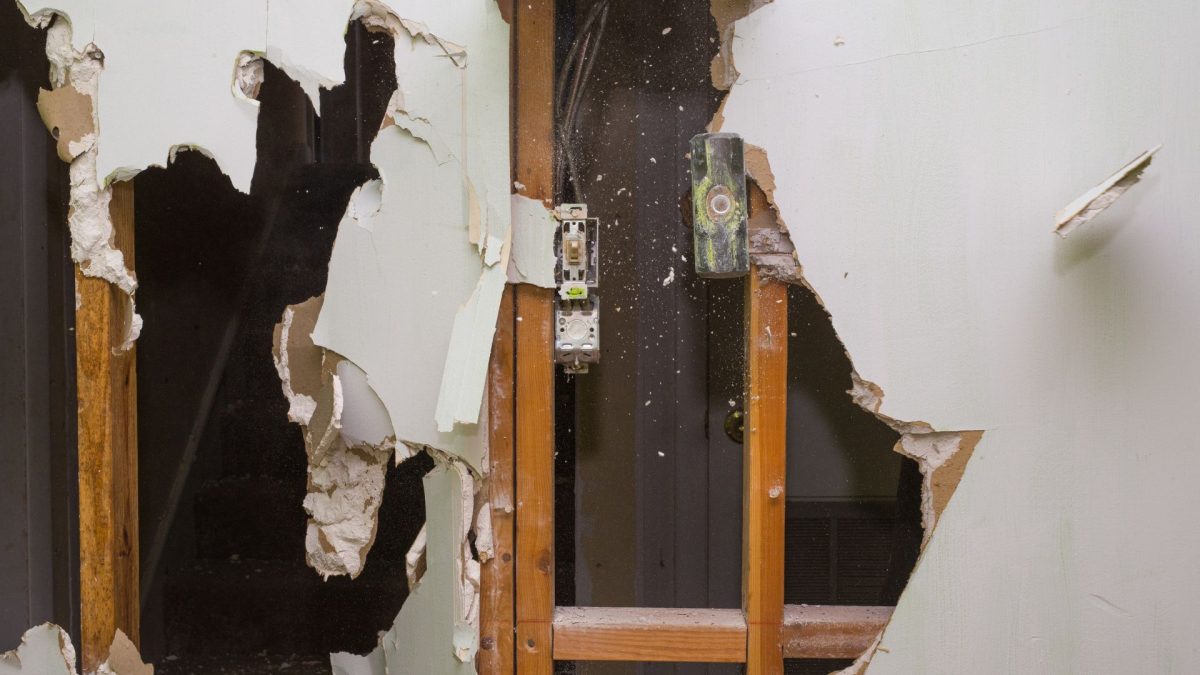
Dealing with Electrical and Plumbing Considerations
Electrical and plumbing elements require careful attention during drywall removal to avoid dangerous mishaps. Before starting, turn off power to affected areas and shut off water supply when necessary. Identify and locate wiring, outlets, switches, and plumbing lines behind the drywall to prevent accidental damage. Use a stud finder with a wire detection feature to safely navigate these obstacles. Carefully cutting around these areas rather than ripping through blindly reduces the risk of shocks, leaks, or costly repairs. Paying attention to these details safeguards your home and ensures the demolition does not create further complications.
Moreover, planning for temporary protection of exposed wiring and pipes is crucial. Cover openings with plastic or foam to prevent debris from entering or causing blockages. If you are uncertain about complex electrical or plumbing setups, consulting a professional is the safest course of action. Documenting the location of critical components also helps during the reconstruction phase, ensuring smooth reinstallation of walls, fixtures, and outlets. Taking these steps minimizes risks and preserves both your safety and the home’s infrastructure, allowing the renovation to continue without unexpected setbacks or interruptions.
Planning for Debris Disposal and Recycling
Efficient disposal and recycling of drywall debris is an essential part of responsible renovation. Drywall waste can be substantial, and improper handling can create clutter and environmental hazards. Begin by arranging sturdy containers or heavy-duty bags for immediate collection. Separate pieces that can be recycled from those requiring disposal. Local recycling facilities often accept drywall, so researching available options in advance streamlines the process. Responsible debris management not only keeps the work area safe but also contributes to sustainable practices, reducing the environmental footprint of your renovation.
Additionally, organizing debris removal in phases can enhance efficiency. Clearing smaller sections as you progress prevents accumulation and keeps pathways clear. Scheduling regular pickups or coordinating with a junk removal service ensures that waste is removed promptly, minimizing disruption. Maintaining a tidy workspace facilitates quicker progress and reduces the chance of accidental injury from scattered materials. By planning ahead for debris disposal and recycling, you maintain order, promote sustainability, and pave the way for a smoother transition into the reconstruction stage of your renovation.
Coordinating with Contractors or Professionals
Coordinating with contractors or other professionals is vital when drywall removal is part of a larger renovation project. Communicate clearly about the timing, scope, and safety precautions to ensure everyone is on the same page. Professional input can prevent costly mistakes and speed up the process. Experienced contractors can identify hidden structural issues, electrical hazards, or plumbing concerns that may be overlooked during DIY demolition. Establishing a timeline that accommodates both removal and reconstruction ensures a seamless workflow and avoids delays. Collaboration enhances efficiency and improves the overall quality of your renovation.
Furthermore, maintaining open communication channels with all involved parties is essential for safety and accountability. Provide updates on progress, clarify responsibilities, and discuss potential challenges as they arise. This coordination helps in synchronizing schedules, securing the necessary permits, and ensuring that each phase of the renovation aligns with project goals. A proactive approach to collaboration reduces stress, prevents misunderstandings, and creates a more organized work environment. By working closely with professionals, you ensure that drywall removal integrates smoothly into the broader renovation plan, enhancing results and minimizing disruption.
Preventing Damage to Surrounding Structures
Preventing damage to surrounding structures during drywall removal requires careful planning and technique. Walls, floors, and ceilings adjacent to the demolition site are vulnerable to accidental impact, scratches, or punctures. Using protective coverings and strategically placing tools helps minimize the risk of unintended damage. Taking slow, deliberate actions when removing panels and being mindful of the structure beneath ensures that the integrity of the home remains intact. Protecting surrounding areas not only preserves aesthetics but also reduces potential repair costs after demolition.
In addition, regularly inspecting the work area during the removal process allows you to identify and address potential issues early. Adjusting methods when necessary, reinforcing fragile sections, and using appropriate tools for different surfaces all contribute to safe handling. Keeping pathways clear and organizing debris removal prevents accidental collisions with walls or furniture. By proactively safeguarding adjacent structures, you maintain a professional approach to demolition and ensure that the renovation progresses without unnecessary setbacks or repairs, ultimately preserving both time and resources.
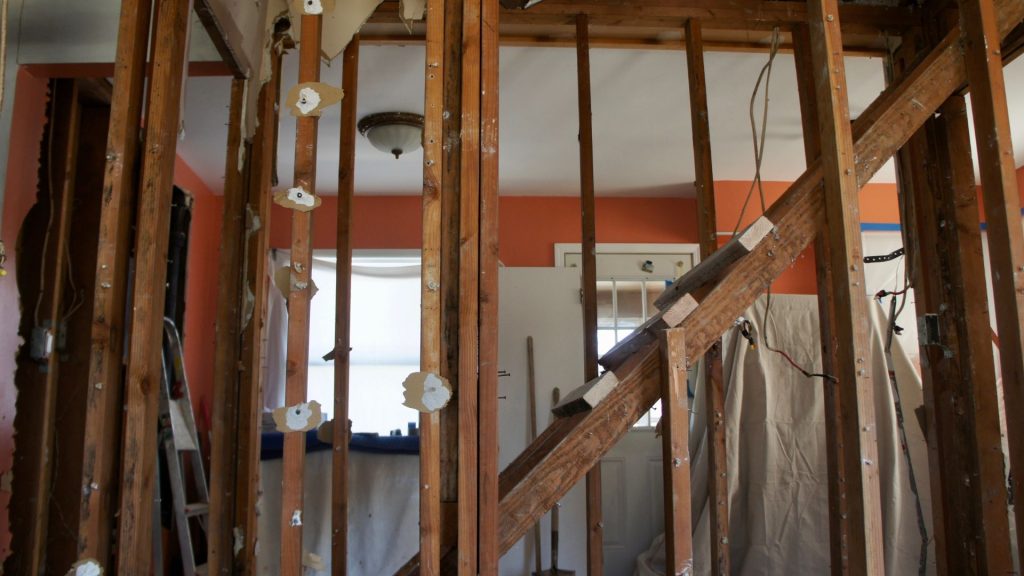
Transitioning Smoothly to Wall Reconstruction
After drywall removal, transitioning to wall reconstruction requires careful preparation and planning. Start by inspecting studs, insulation, and any exposed wiring or plumbing to ensure everything is in proper condition before new drywall installation. Repair or replace damaged sections, and confirm that all electrical and plumbing systems are secure. This preparation sets the stage for a seamless rebuild and prevents future complications. A smooth transition from demolition to reconstruction saves time, maintains structural integrity, and ensures the quality of your renovation project remains high.
Additionally, organizing materials and scheduling the reconstruction phase promptly helps maintain momentum. Having drywall sheets, screws, joint compound, and other essentials ready reduces downtime. Coordinating with any contractors or team members involved ensures everyone understands their roles and responsibilities. Establishing a clear plan for the next steps allows for efficient installation, taping, and finishing of the new walls. By approaching the reconstruction with preparation and focus, you create a streamlined process that maximizes results and minimizes disruption, bringing your home renovation closer to completion with confidence and efficiency.
Conclusion
Managing drywall removal during a home renovation involves careful planning, safe techniques, and efficient handling of debris. From preparing your space to coordinating with professionals, each step is essential for a smooth demolition process. Employing protective measures, understanding the scope, and using the right tools ensures safety and minimizes damage to your home. Effective dust management, careful attention to electrical and plumbing elements, and strategic debris disposal keep the project organized and stress-free. Maintaining open communication with contractors and safeguarding surrounding structures further supports a successful renovation, ensuring that the transition to wall reconstruction is seamless and efficient.
For residents of Palatine, IL looking for professional assistance with debris removal, 24-7 Junk Removal offers comprehensive services to make the process easier and more efficient. Their team handles all aspects of junk removal, providing safe and environmentally responsible disposal. Whether tackling drywall or other renovation debris, they ensure a clean and manageable workspace. Contact 24-7 Junk Removal at (773) 309-6966 or visit their location at 611 W. Wise Schaumburg, IL 60193 for expert support and guidance, ensuring your home renovation proceeds without unnecessary stress or delay.