
Drywall is one of the most common materials used in modern construction, forming the walls and ceilings of countless homes. Its smooth, flat surface creates the perfect canvas for painting, wallpaper, or decorative finishes, while also providing some fire resistance and insulation. Despite its ubiquity, drywall is not indestructible. Over time, walls may suffer from water damage, cracks, or outdated designs, prompting homeowners to consider removal. Before diving into a project, understanding the structure of drywall is crucial. Standard drywall sheets consist of gypsum plaster pressed between two thick sheets of paper, which makes it relatively lightweight but prone to crumbling if handled improperly. Its joints are sealed with tape and compound, creating a seamless appearance, which can complicate removal if done incorrectly.
Knowing what you are working with helps prevent unnecessary damage to surrounding structures and ensures safety throughout the process. Drywall removal can be more complex than it seems, as it often involves dealing with nails, screws, and potential hidden hazards such as electrical wiring or plumbing. Proper planning and preparation save time, reduce risk, and make cleanup more manageable. Recognizing the type and thickness of your drywall, as well as any additional layers like soundproofing, is the first step toward an efficient and safe removal process. Understanding these elements allows homeowners to approach the project with confidence and care.
Planning Your Drywall Removal Project
Before removing drywall, it’s essential to have a clear plan in place. Begin by evaluating the area and deciding whether the project is localized, such as repairing a single wall, or more extensive, involving entire rooms. Take measurements, note the location of studs, electrical outlets, and plumbing fixtures, and determine where debris will be staged for removal. Proper preparation minimizes the risk of accidents and ensures you have a designated space for collecting and sorting the drywall pieces. Gathering the right tools—such as utility knives, pry bars, hammers, and safety equipment—is equally critical. Protective gear including gloves, masks, and eye protection is necessary to guard against dust and debris.
Another vital component of planning is considering disposal. Drywall is bulky and can quickly become unmanageable if not handled correctly. Deciding in advance how to remove and transport the material can streamline the process and reduce the strain on your living space. Depending on the volume, renting a dumpster or hiring a professional service may be the most practical approach. Thoughtful planning helps prevent project fatigue, keeps your home safer during demolition, and ensures the process progresses efficiently. Taking the time to map out your project and anticipate challenges makes drywall removal a more manageable and controlled undertaking.
Essential Tools for Safe Drywall Removal
Drywall removal requires a combination of hand tools and protective equipment to ensure efficiency and safety. A sturdy utility knife is crucial for scoring drywall along seams, allowing it to break away cleanly without splintering. Pry bars and hammers help remove sheets from studs, while screwdrivers or drills are needed to take out screws. Taping knives and putty scrapers can assist in detaching compound from joints. For larger projects, consider a reciprocating saw to cut through drywall quickly, though care must be taken to avoid hidden wiring or pipes behind walls. Using the correct tools prevents accidental damage to studs, electrical systems, and other structural elements.
Safety equipment is equally important when handling drywall. Protective eyewear prevents irritation from dust and flying debris, while gloves protect your hands from sharp edges. Masks or respirators safeguard against inhaling fine gypsum dust, which can cause respiratory issues over time. Covering furniture and flooring with tarps reduces cleanup time and protects surfaces from scratches and dust accumulation. Having the right tools and protective equipment on hand ensures the project moves smoothly, reduces the likelihood of injuries, and maintains a cleaner, safer working environment. Preparing for both the physical and safety aspects of drywall removal is an investment in a stress-free and effective project.
Preparing Your Space for Removal
Proper preparation of the space is a fundamental step that greatly influences the efficiency of drywall removal. Start by clearing the area of furniture, fixtures, and decorative items that could be damaged or obstruct your work. Protect floors with drop cloths or plastic sheeting to catch debris and make post-project cleanup simpler. If the drywall contains hazardous materials such as asbestos, professional testing and removal are mandatory to comply with safety regulations. Marking areas where studs, electrical outlets, and plumbing run helps avoid accidental damage and ensures a smoother demolition process.
Sealing off adjacent rooms using plastic sheeting or temporary barriers limits dust migration throughout your home. Proper ventilation is also crucial, as drywall dust can linger and affect air quality. Remove outlet covers, switch plates, and light fixtures to prevent damage, and switch off electricity to reduce the risk of electrical accidents. Prepping your space carefully not only protects your belongings and structural elements but also creates a more organized environment where removal can proceed with minimal disruptions. Thoughtful preparation sets the foundation for a safe, efficient, and stress-free drywall removal project.
Techniques for Removing Drywall Efficiently
Efficient drywall removal combines methodical planning with strategic techniques to reduce labor and minimize mess. Begin by scoring along the joints using a utility knife, then gently pry the drywall away from the studs. Working in sections rather than attempting to remove entire walls at once makes the process more manageable. Start from the top, gradually working down to the base, which prevents large, uncontrollable pieces from falling and causing damage. Using a hammer or pry bar carefully allows you to detach the sheets without harming the underlying studs or wiring.
For areas with screws, a drill or screwdriver is necessary to remove fasteners before attempting to pull away the drywall. In cases of stubborn or large sheets, cutting them into smaller sections makes handling easier and safer. Pay attention to any hidden obstacles such as nails, electrical cables, or pipes, and work slowly to avoid accidents. Maintaining an organized approach to debris removal ensures a cleaner workspace and reduces the risk of injury. Strategic techniques enhance efficiency, save time, and make the overall drywall removal process more controlled and less stressful.
Managing Dust and Debris
Drywall removal inevitably produces significant dust and debris, which can quickly spread throughout your home if not properly managed. Using tarps, plastic sheeting, and containment barriers helps confine dust to the work area. Employing a vacuum equipped with a HEPA filter during the project minimizes airborne particles, while dampening surfaces with water can reduce dust clouds. Wearing protective masks or respirators is essential to protect respiratory health, as fine drywall particles can irritate lungs and aggravate pre-existing conditions.
Handling debris promptly also aids in maintaining a safe environment. Designate a collection point for drywall fragments, separating them from other waste materials to facilitate disposal or recycling. Large sections of drywall can be broken into manageable pieces before transport to prevent injuries and simplify cleanup. Efficient dust and debris management keeps the project more organized, protects the home’s air quality, and ensures a smoother, healthier demolition experience. Paying attention to cleanup throughout the process reduces the overwhelming nature of post-project mess.
Dealing with Electrical and Plumbing Obstacles
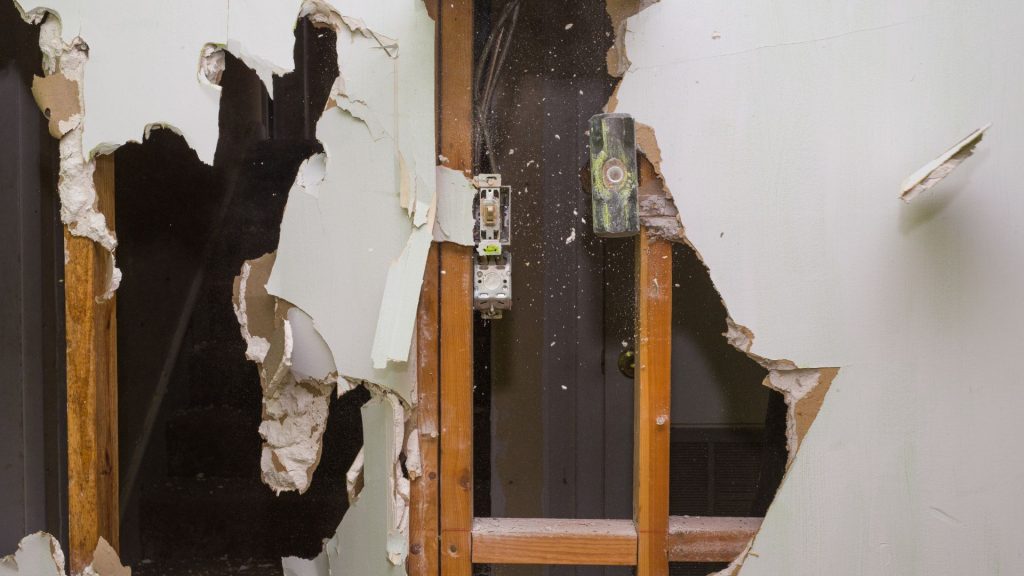
Drywall often conceals essential elements like electrical wiring and plumbing, which must be carefully navigated during removal. Before cutting or prying, identify the locations of outlets, switches, and pipes using stud finders, diagrams, or previous construction plans. Turning off the electricity to the affected area reduces the risk of shocks or accidents. Plumbing should also be shut off if removing drywall near water lines, as leaks or ruptures can lead to costly damage and safety hazards.
Exercise caution when removing drywall around these systems to avoid punctures, shorts, or flooding. Small sections can be removed near sensitive areas, allowing a gradual and controlled exposure of hidden components. Documenting these areas and keeping tools on hand for quick adjustments ensures the project progresses without unexpected interruptions. Careful attention to electrical and plumbing obstacles safeguards both your home and yourself while maintaining the integrity of essential systems throughout the drywall removal process.
Safe Handling and Disposal Practices
Once drywall is removed, handling and disposal become the next critical steps. Large sheets should be broken down into smaller, manageable pieces to reduce strain and facilitate transport. Avoid overloading wheelbarrows or trash bins to prevent injuries. Depending on local regulations, drywall may need to be disposed of at designated recycling centers or landfills. Many communities encourage recycling to reduce environmental impact, so check for available programs. Keeping the debris contained during transport prevents scattering and additional cleanup later.
Using proper lifting techniques protects your back and joints from strain, especially when moving heavy sections. Wearing gloves helps avoid cuts from sharp edges, while covering the load with tarps during transport keeps dust and particles from escaping. Safe handling and responsible disposal reflect a commitment to both personal safety and environmental stewardship. Implementing these practices ensures that the drywall removal project is completed efficiently and sustainably, leaving your space ready for renovation or remodeling.
Hiring Professionals for Complex Jobs
While DIY drywall removal can be effective for small projects, larger or more complicated jobs often require professional intervention. Experts bring the right tools, experience, and safety protocols to handle difficult situations such as multiple layers of drywall, intricate electrical layouts, or water-damaged walls. Professional services save time, reduce physical strain, and ensure proper disposal of materials according to local regulations. They can also provide guidance on whether additional repairs or reinforcements are needed after demolition.
Hiring experienced teams allows homeowners to focus on planning the next stages of renovation rather than worrying about safety, efficiency, or disposal. Professionals understand how to manage dust, debris, and hidden obstacles while minimizing damage to surrounding structures. This approach often results in a smoother project timeline, fewer mistakes, and a safer environment for everyone involved. Engaging experts for complex drywall removal ensures the job is handled thoroughly and responsibly, making the renovation process more predictable and stress-free.
Common Mistakes to Avoid
Removing drywall may seem straightforward, but several common mistakes can slow progress and cause unnecessary damage. Cutting too aggressively without checking for hidden wiring or plumbing can result in costly repairs. Failing to protect floors and furniture can create a messy and difficult cleanup. Overlooking proper safety gear or working in poorly ventilated spaces exposes workers to dust-related health issues. Neglecting to plan for debris removal can leave a cluttered workspace and prolong the project unnecessarily.
Being aware of these pitfalls allows homeowners to take a more deliberate approach. Work methodically, prepare adequately, and address hidden obstacles before starting the removal process. Proper planning, protection, and attention to detail prevent accidents and reduce stress during the project. Recognizing and avoiding these mistakes contributes to a safer, more efficient, and less chaotic drywall removal experience, helping your home transition smoothly to the next stage of improvement.
Conclusion
Undertaking drywall removal can be a challenging but rewarding aspect of home renovation. With careful planning, the right tools, and attention to safety, you can transform your space efficiently and effectively. Protecting your home and managing debris ensures a smoother workflow while minimizing risks. Knowing how to navigate electrical and plumbing obstacles and practicing safe handling prepares you for a successful project. Whether tackling a single wall or an entire room, thorough preparation is key to a satisfying outcome.
For homeowners in Palatine, IL seeking professional assistance with drywall removal or other renovation cleanup, 24-7 Junk Removal offers reliable and efficient services. Their experienced teams provide comprehensive junk removal solutions tailored to residential or commercial needs. Contact them at (773) 309-6966 or visit their location at 611 W. Wise Schaumburg, IL 60193 for personalized support. With their guidance, you can achieve a clean, organized space and ensure that all debris is handled responsibly and safely.