
The first step in any flooring removal project involves assessing the type of material currently installed. Each material presents its own set of challenges and requires a specific approach. Hardwood floors might need careful prying to avoid damaging the subfloor, while vinyl or laminate can often be pulled up more quickly but may leave behind stubborn adhesive residues. The process is not just about removing what is visible, but also addressing the hidden layers beneath the surface. Careful planning can minimize unnecessary damage and reduce cleanup time. Professionals often take stock of the space, gather necessary tools, and determine the safest removal strategy before lifting a single plank or tile.
Once the plan is in place, preparation becomes essential. Protecting adjacent surfaces, ensuring proper ventilation, and wearing safety equipment are critical steps that prevent injuries and reduce the mess. Dust, debris, and scraps are inevitable, and the more prepared one is, the smoother the removal becomes. Flooring removal requires patience and attention to detail. It is a process that combines both physical effort and methodical decision-making, allowing for a cleaner, more efficient transition to the next phase of renovation.
Identifying the Flooring Type and Materials
Before the removal begins, it is crucial to identify the type of flooring in place. Materials such as tile, laminate, carpet, hardwood, and vinyl all come with distinct challenges. Tiles, for instance, are often bonded with mortar, making them tougher to remove, while carpet is usually attached with staples or adhesive. Identifying the material helps in determining the right tools and techniques needed for removal, ensuring the job is completed efficiently and without unnecessary strain. Understanding the subfloor is also essential, as certain flooring types may leave residues or damage that need repair before installing new flooring.

Material identification also guides safety precautions. Some older materials, like vinyl or linoleum, may contain substances that require special handling to avoid exposure. Tools vary as well; while a crowbar and hammer may suffice for some materials, power tools might be necessary for tougher surfaces. This initial step helps streamline the removal process, minimizing surprises and preventing costly mistakes. Knowing what you are working with ensures that every action is calculated and effective, making the process smoother and more predictable for homeowners or contractors alike.
Preparing the Space for Flooring Removal
Preparation is one of the most overlooked but critical aspects of flooring removal. Clearing the room of furniture and other obstructions ensures that work can proceed uninterrupted and reduces the risk of accidental damage. Covering doorways and vents can contain dust, while laying protective sheeting on any remaining surfaces helps safeguard against scratches and debris. This stage also involves gathering all necessary tools and safety gear, including gloves, knee pads, and eye protection. Proper preparation sets the tone for the removal process, allowing work to proceed efficiently while keeping the area as clean as possible.
In addition to physical preparation, scheduling and planning play a role in ensuring a smooth process. Removing flooring can be labor-intensive, and having a clear timeline helps prevent fatigue or rushed mistakes. Coordination is especially important in larger projects where multiple rooms or floors are involved. Taking the time to mentally and physically prepare not only makes the task less overwhelming but also increases safety and efficiency. A well-prepared space is the foundation for a successful flooring removal project, minimizing disruption and laying the groundwork for the next phase of renovation.
Tools Needed for Flooring Removal
The success of a flooring removal project often hinges on having the right tools. Basic hand tools like hammers, crowbars, and putty knives are essential for prying and scraping surfaces. Power tools such as oscillating multi-tools or floor scrapers can speed up the process, especially with stubborn adhesives or thick flooring layers. The type of flooring determines the tools required, and investing in proper equipment prevents unnecessary damage to the subfloor. Having the right tools also reduces fatigue and makes the process more manageable, especially for larger spaces.
Safety gear is equally important. Gloves, goggles, and knee pads protect from sharp edges, dust, and debris. Some projects may require respiratory masks, especially when working with older flooring that could release harmful particles. Using the correct tools and safety equipment makes the process faster, cleaner, and safer. Preparing the right set of instruments in advance ensures that the work progresses without interruptions, making the task less stressful and more predictable, which is essential for maintaining momentum throughout the removal process.
Removing Hardwood and Laminate Floors
Hardwood and laminate floors require particular attention during removal. Hardwood often involves carefully prying up planks to prevent splintering and preserve the integrity of the subfloor. Laminate floors, while generally easier to remove, may be glued or locked tightly, requiring additional effort to pull apart. Starting in a corner or along a wall and working systematically across the room helps maintain control and efficiency. The process demands patience, as rushing can lead to damage that will require costly repairs.
Once planks are lifted, the subfloor often needs cleaning. Adhesive residues, nails, or staples must be removed before new flooring can be installed. This step ensures a smooth and even surface, reducing the risk of future issues such as uneven wear or squeaks. The removal of hardwood and laminate is labor-intensive but rewarding when approached with strategy and care. Proper execution at this stage lays the groundwork for a flawless flooring installation, setting the tone for the overall renovation.
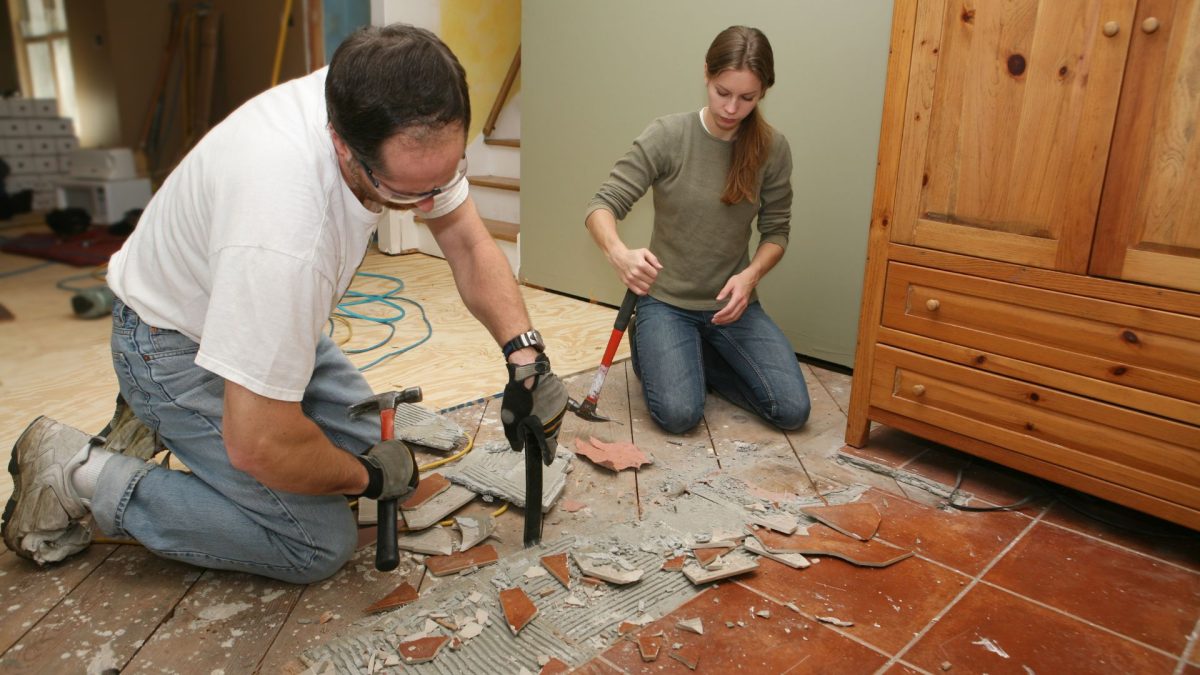
Removing Tile Flooring
Tile removal presents its own unique set of challenges. Tiles are usually adhered with mortar or thin-set, which can be stubborn to remove. Starting at a loose edge or using a hammer and chisel to break tiles systematically reduces the risk of flying debris and excessive dust. Removing tile requires patience and a systematic approach, as working too quickly can damage the subfloor beneath or send shards into surrounding areas. Protective equipment is crucial to avoid injuries during this process.
Once tiles are lifted, scraping away the remaining mortar or adhesive ensures that the surface is ready for new flooring. This often requires specialized tools such as floor scrapers or grinders to achieve a smooth, clean base. Preparing the subfloor thoroughly prevents uneven installation and ensures longevity for the new flooring. Tile removal is a labor-intensive process, but careful technique minimizes damage and makes the next phase of flooring installation significantly easier and more predictable.
Removing Carpet and Vinyl Flooring
Carpet removal generally involves pulling up the material and removing staples or tack strips. Vinyl flooring may be glued down, requiring additional effort to lift and scrape away adhesive. Both types of flooring can be dusty and messy, making containment measures essential. Removing these floors is often quicker than hardwood or tile, but careful attention ensures that the subfloor remains intact and free from damage. Tools such as utility knives, pliers, and scrapers facilitate this process.
Preparation also extends to disposal. Carpet and vinyl often come in large, cumbersome pieces that require proper handling to avoid injury or mess. Rolling up carpet and cutting vinyl into manageable sections makes transport and disposal more manageable. The removal process, while straightforward, benefits from strategic planning and methodical execution. Proper technique ensures that the space is left clean, ready for the next phase, and minimizes strain on those performing the work.
Handling Adhesive and Residue Removal
After removing flooring, adhesive residues often remain on the subfloor. Addressing these residues is crucial for the success of the next flooring installation. Scraping and sanding may be required, and sometimes chemical adhesive removers are necessary to eliminate stubborn patches. Proper handling of these materials is important, as some can be hazardous if inhaled or come into contact with skin. The goal is a smooth, clean surface that is ready for a flawless new installation.
This stage often requires patience and careful technique. Rushing can leave uneven patches that compromise the new flooring or lead to squeaks and bumps. Protective gear is essential, as residue removal can generate dust and chemical exposure. Completing this step thoroughly ensures a smooth foundation, enhancing both the aesthetic and functional longevity of the new flooring. Proper residue removal is a critical part of the flooring removal process that sets the stage for successful installation and a polished final result.
Cleaning Up Debris During and After Removal
Flooring removal generates significant debris, including broken tiles, planks, nails, staples, and dust. Cleaning as you go helps maintain a safer work environment and reduces the risk of accidents. Containing debris in bags or containers allows for efficient disposal and prevents scattering across the home. Regularly sweeping and vacuuming helps manage dust levels and keeps the workspace organized. This stage is as much about safety as it is about aesthetics.
Post-removal cleanup is equally important. Thoroughly clearing the space prepares it for new flooring installation and ensures the area is safe for occupants. Protective masks, gloves, and proper disposal methods keep the process hygienic and efficient. A clean subfloor allows for accurate measurements and alignment during installation, preventing errors that could lead to uneven surfaces or future damage. Cleanup is a key part of a well-executed flooring removal project, making the transition to new flooring smoother and more enjoyable.
Avoiding Common Flooring Removal Mistakes
Mistakes during flooring removal can be costly and frustrating. Common errors include starting without the right tools, neglecting safety gear, or skipping subfloor preparation. Each mistake increases the risk of damage or injury and can extend the project timeline unnecessarily. Awareness of potential pitfalls allows for better planning and execution. Taking the time to work carefully and systematically reduces errors and ensures a cleaner, more efficient removal process.
Another common mistake is underestimating the difficulty of adhesive removal or subfloor preparation. Overlooking these steps can compromise the longevity of new flooring and result in additional repairs. Planning ahead, using proper techniques, and understanding the nuances of each material type help prevent setbacks. Flooring removal is as much about strategy as physical effort, and avoiding mistakes ensures a smoother, faster, and more successful renovation experience.
Safety Precautions During Flooring Removal
Safety is paramount in any flooring removal project. Protective equipment such as gloves, goggles, knee pads, and dust masks safeguard against cuts, splinters, dust, and chemical exposure. Ensuring proper ventilation is important when working with adhesives or older materials that may emit fumes. Taking regular breaks and using proper lifting techniques also prevents strain and injury. Prioritizing safety allows the removal process to proceed smoothly without unnecessary setbacks.
Being mindful of surroundings is equally important. Furniture, sharp tools, and debris can create hazards if not managed carefully. Marking off the work area and maintaining organization minimizes the risk of accidents. Flooring removal may be physically demanding, but adhering to safety protocols protects both workers and homeowners. A safety-conscious approach ensures that the project is completed efficiently and without incident, allowing the focus to remain on achieving a clean and ready-to-renovate space.
Planning for Disposal of Removed Flooring
Proper disposal of old flooring is a critical step often overlooked. Materials such as wood, tile, vinyl, and carpet must be handled appropriately to comply with local regulations and reduce environmental impact. Coordinating disposal methods in advance saves time and prevents delays. Recycling or donating salvageable materials can also minimize waste and benefit the community. Planning for disposal ensures that the space remains organized and ready for the next phase of renovation.
Disposal planning also influences the removal process itself. Knowing how to transport debris safely and efficiently reduces strain and prevents messes from spreading throughout the home. Whether utilizing professional hauling services or local waste facilities, proper planning ensures a smooth transition from old flooring to new. Efficient disposal is a crucial part of the process, keeping the project on track, minimizing environmental impact, and leaving the space clean and prepared for the next installation.
Conclusion
Flooring removal is a complex, labor-intensive process that requires planning, patience, and proper technique. Understanding the material, preparing the space, using the right tools, and following safety precautions ensures a smoother, more efficient process. Each step, from identifying the flooring type to removing adhesives and cleaning debris, contributes to a successful renovation. Homeowners or contractors who approach flooring removal methodically minimize mistakes, reduce stress, and lay the foundation for beautiful new flooring.
For residents in Palatine, IL, 24-7 Junk Removal offers professional junk removal services to handle all flooring debris efficiently. Their experienced team ensures safe, timely, and thorough cleanup, making your renovation process easier. Whether dealing with hardwood, tile, carpet, or vinyl, 24-7 Junk Removal can transport and dispose of materials responsibly. Contact them at (773) 309-6966 or visit 611 W. Wise Schaumburg, IL 60193 for more information or support via email at support@24-7junk.com. Their reliable services save time, reduce stress, and leave your space ready for the next step in your home improvement journey.